> ## Documentation Index
> Fetch the complete documentation index at: https://www.getmaxim.ai/docs/llms.txt
> Use this file to discover all available pages before exploring further.
# Prompt Deployment
> Quick iterations on Prompts should not require code deployments every time. With more and more stakeholders working on prompt engineering, its critical to keep deployments of Prompts as easy as possible without much overhead. Prompt deployments on Maxim allow conditional deployment of prompt changes that can be used via the SDK.
## Why Deploy Prompts via Maxim
* Prompt experimentation - Create multiple versions of your Prompts, and use a wide variety of models available on Maxim to test and compare their performance using your custom data.
* Deploy without code changes - Deploy the final version directly from UI—no code changes required. Use Maxim's RBAC support to limit deployment permission to key stakeholders.
* Custom variables - Use custom variables to create rules to control which environments or user groups should receive the updates. This helps in setting up A/B tests or testing prompt variations internally before pushing to users.
### Deploying a prompt
Open the prompt version you want to deploy.
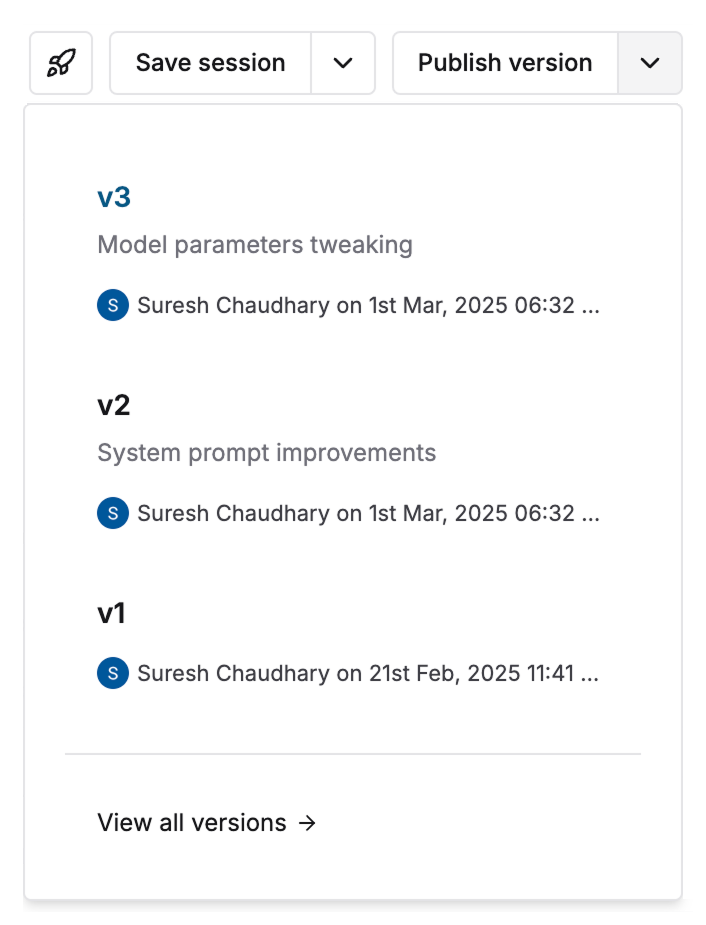 Click the button in the header and choose to deploy the present version.
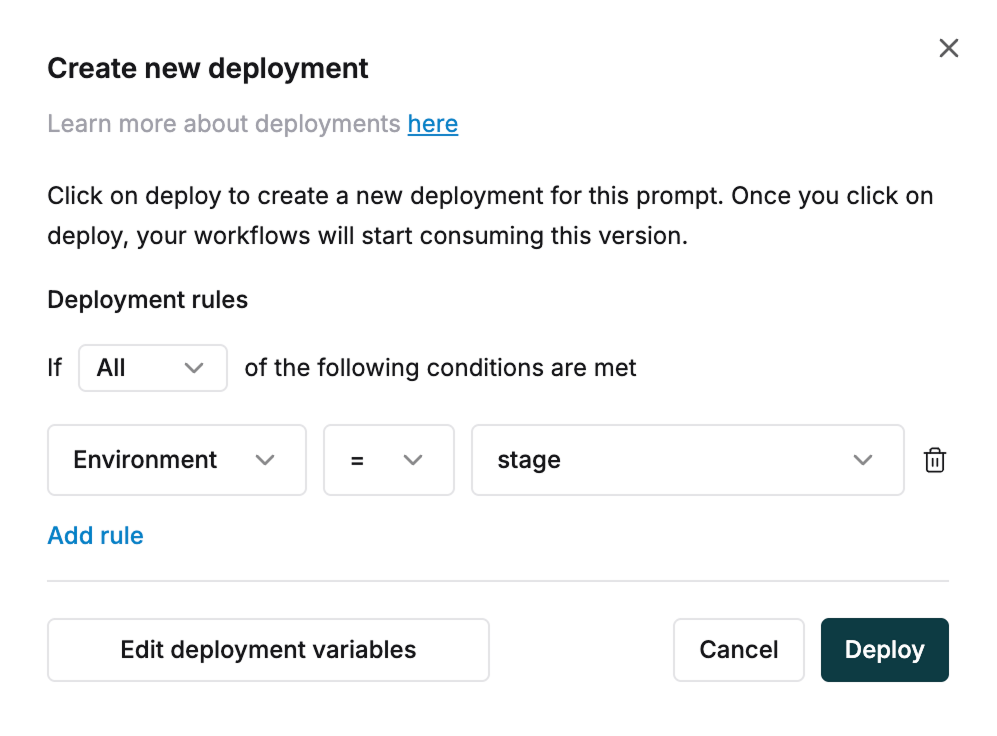
Add one or more rules for deployment e.g. Environment = prod.
Click the button in the header and choose to deploy the present version.
Add one or more rules for deployment e.g. Environment = prod.
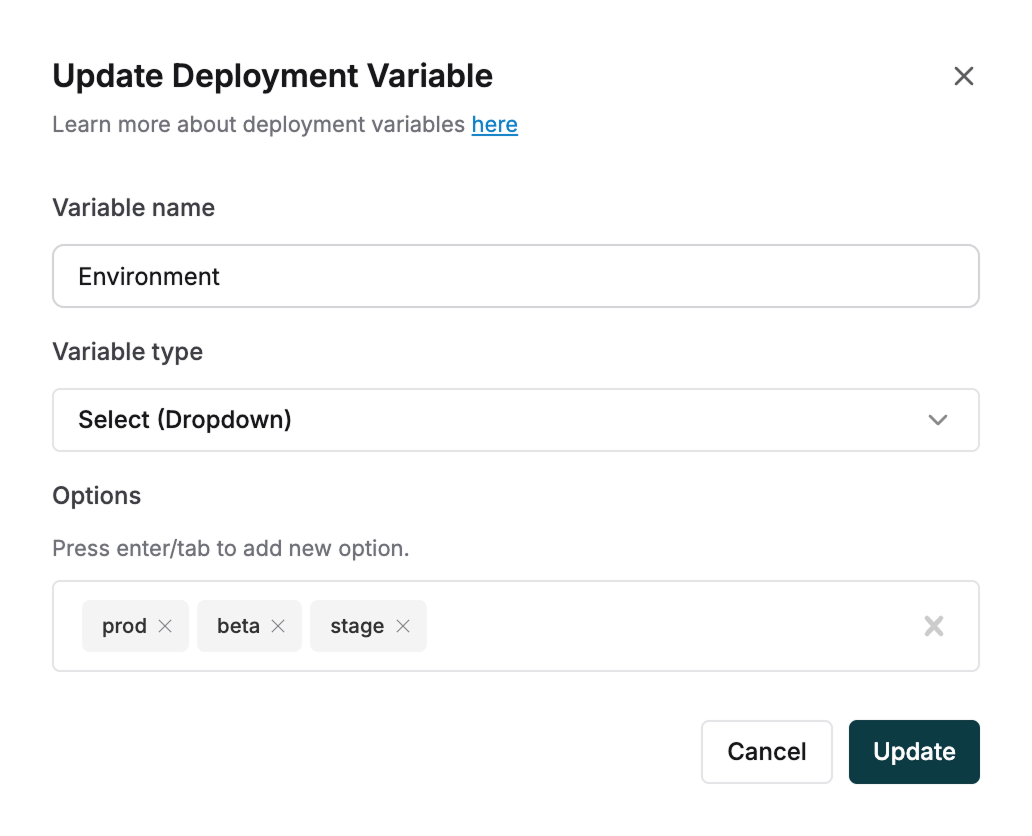
 Edit or define new variables by clicking `Edit deployment variables`
Define the name and type of any variable.
* For variables of type `select` provide possible options. e.g. Environment: Beta, Staging, Prod.
Edit or define new variables by clicking `Edit deployment variables`
Define the name and type of any variable.
* For variables of type `select` provide possible options. e.g. Environment: Beta, Staging, Prod.
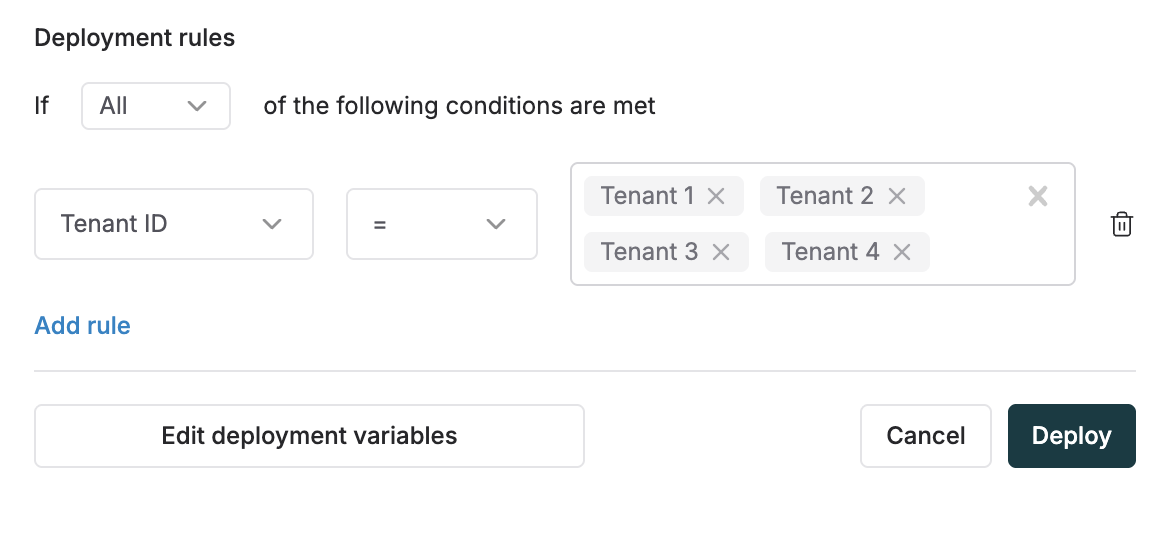
 * For variables of type `multiselect`, configure when the deployment runs:
* all selected options are present in the deployment rule using the `=` operator, or
* any of the selected options are present in the deployment rule using the `includes` operator.
* For variables of type `multiselect`, configure when the deployment runs:
* all selected options are present in the deployment rule using the `=` operator, or
* any of the selected options are present in the deployment rule using the `includes` operator.
 Every time you have a new version to deploy, use the variable based rules to deploy conditionally.
View existing deployments for any prompt from the deploy button in the header.
Every time you have a new version to deploy, use the variable based rules to deploy conditionally.
View existing deployments for any prompt from the deploy button in the header.
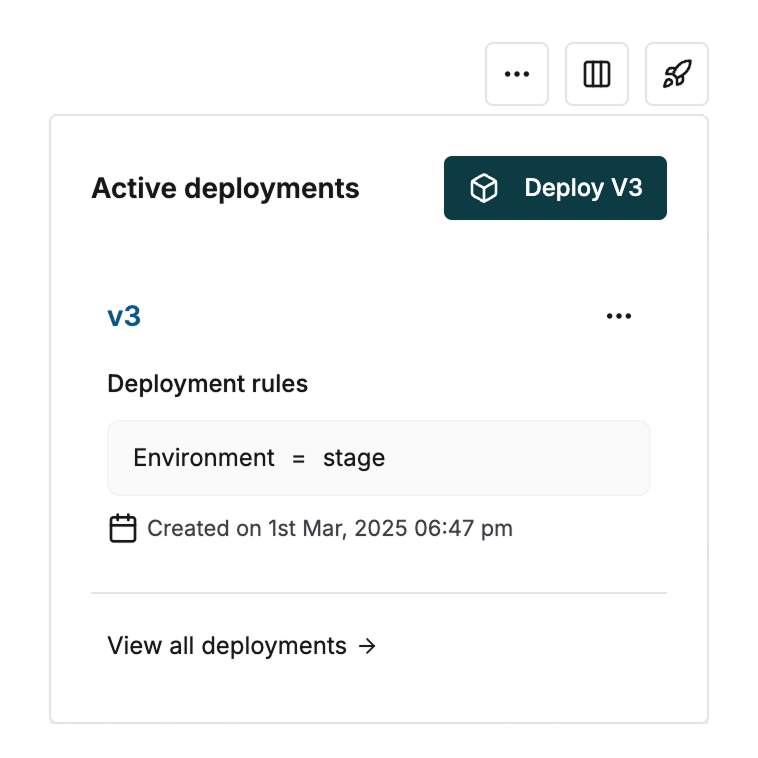 When you create multiple deployments via the UI, only the latest deployment is available for use.
## Fetching Prompts via SDK
For building query to get prompt with specific deployment variables, you can use `QueryBuilder`.
```typescript JS/TS theme={null}
import { Maxim, QueryBuilder } from "@maximai/maxim-js;
const maxim = new Maxim({ apiKey: "", promptManagement: true });
const prompt = await maxim.getPrompt("prompt-id",
new QueryBuilder()
.and()
.deploymentVar("Environment", "prod")
.build());
```
```python Python theme={null}
from maxim import Maxim, Config
from maxim.models import QueryBuilder
maxim = Maxim(Config(api_key="", prompt_management=True))
prompt = maxim.get_prompt("prompt-id",
QueryBuilder()
.and_()
.deployment_var("Environment", "prod")
.build())
```
Add multiple queries
```typescript JS/TS theme={null}
import { Maxim, QueryBuilder } from "@maximai/maxim-js;
const maxim = new Maxim({ apiKey: "", promptManagement: true });
const prompt = await maxim.getPrompt(
"prompt-id",
new QueryBuilder().and().deploymentVar("Environment", "prod").deploymentVar("CustomerId", "123").build(),
);
```
```python Python theme={null}
from maxim import Maxim, Config
from maxim.models import QueryBuilder
maxim = Maxim(Config(api_key="", prompt_management=True))
prompt = maxim.get_prompt("prompt-id",
QueryBuilder()
.and_()
.deployment_var("Environment", "prod")
.deployment_var("CustomerId", "123")
.build())
```
Add filters based on tags
```typescript JS/TS theme={null}
import { Maxim, QueryBuilder } from "@maximai/maxim-js;
const maxim = new Maxim({ apiKey: "", promptManagement: true});
const prompt = await maxim.getPrompt(
"prompt-id",
new QueryBuilder().and().deploymentVar("Environment", "prod").tag("TenantId", "3000").build(),
);
```
```python Python theme={null}
from maxim import Maxim, Config
from maxim.models import QueryBuilder
maxim = Maxim(Config(api_key="", prompt_management=True))
prompt = maxim.get_prompt("prompt-id",
QueryBuilder()
.and_()
.deployment_var("Environment", "prod")
.tag("TenantId", "3000")
.build())
```
Use multiselect variables
```typescript JS/TS theme={null}
import { Maxim, QueryBuilder } from "@maximai/maxim-js;
const maxim = new Maxim({ apiKey: "", promptManagement: true});
const prompt = await maxim.getPrompt(
"prompt-id",
new QueryBuilder().and().deploymentVar("Tenant ID", ["Tenant1"]).build(),
);
```
```python Python theme={null}
from maxim import Maxim, Config
from maxim.models import QueryBuilder
maxim = Maxim(Config(api_key="", prompt_management=True))
prompt = maxim.get_prompt("prompt-id",
QueryBuilder()
.and_()
.deployment_var("Tenant ID", ["Tenant1"])
.build())
```
Fetch a specific prompt version
You can fetch a specific version of a prompt:
```typescript JS/TS theme={null}
import { Maxim, QueryBuilder } from "@maximai/maxim-js";
const maxim = new Maxim({ apiKey: "maxim-api-key", promptManagement: true });
const prompt = await maxim.getPrompt(
"prompt-id",
new QueryBuilder()
.promptVersionNumber(1) // fetches version 1
.build(),
);
```
```python Python theme={null}
from maxim import Maxim, Config
from maxim.models import QueryBuilder
maxim = Maxim(Config(api_key="", prompt_management=True))
prompt = maxim.get_prompt("prompt-id",
QueryBuilder()
.prompt_version_number(1) # fetches version 1
.build())
```
When you create multiple deployments via the UI, only the latest deployment is available for use.
## Fetching Prompts via SDK
For building query to get prompt with specific deployment variables, you can use `QueryBuilder`.
```typescript JS/TS theme={null}
import { Maxim, QueryBuilder } from "@maximai/maxim-js;
const maxim = new Maxim({ apiKey: "", promptManagement: true });
const prompt = await maxim.getPrompt("prompt-id",
new QueryBuilder()
.and()
.deploymentVar("Environment", "prod")
.build());
```
```python Python theme={null}
from maxim import Maxim, Config
from maxim.models import QueryBuilder
maxim = Maxim(Config(api_key="", prompt_management=True))
prompt = maxim.get_prompt("prompt-id",
QueryBuilder()
.and_()
.deployment_var("Environment", "prod")
.build())
```
Add multiple queries
```typescript JS/TS theme={null}
import { Maxim, QueryBuilder } from "@maximai/maxim-js;
const maxim = new Maxim({ apiKey: "", promptManagement: true });
const prompt = await maxim.getPrompt(
"prompt-id",
new QueryBuilder().and().deploymentVar("Environment", "prod").deploymentVar("CustomerId", "123").build(),
);
```
```python Python theme={null}
from maxim import Maxim, Config
from maxim.models import QueryBuilder
maxim = Maxim(Config(api_key="", prompt_management=True))
prompt = maxim.get_prompt("prompt-id",
QueryBuilder()
.and_()
.deployment_var("Environment", "prod")
.deployment_var("CustomerId", "123")
.build())
```
Add filters based on tags
```typescript JS/TS theme={null}
import { Maxim, QueryBuilder } from "@maximai/maxim-js;
const maxim = new Maxim({ apiKey: "", promptManagement: true});
const prompt = await maxim.getPrompt(
"prompt-id",
new QueryBuilder().and().deploymentVar("Environment", "prod").tag("TenantId", "3000").build(),
);
```
```python Python theme={null}
from maxim import Maxim, Config
from maxim.models import QueryBuilder
maxim = Maxim(Config(api_key="", prompt_management=True))
prompt = maxim.get_prompt("prompt-id",
QueryBuilder()
.and_()
.deployment_var("Environment", "prod")
.tag("TenantId", "3000")
.build())
```
Use multiselect variables
```typescript JS/TS theme={null}
import { Maxim, QueryBuilder } from "@maximai/maxim-js;
const maxim = new Maxim({ apiKey: "", promptManagement: true});
const prompt = await maxim.getPrompt(
"prompt-id",
new QueryBuilder().and().deploymentVar("Tenant ID", ["Tenant1"]).build(),
);
```
```python Python theme={null}
from maxim import Maxim, Config
from maxim.models import QueryBuilder
maxim = Maxim(Config(api_key="", prompt_management=True))
prompt = maxim.get_prompt("prompt-id",
QueryBuilder()
.and_()
.deployment_var("Tenant ID", ["Tenant1"])
.build())
```
Fetch a specific prompt version
You can fetch a specific version of a prompt:
```typescript JS/TS theme={null}
import { Maxim, QueryBuilder } from "@maximai/maxim-js";
const maxim = new Maxim({ apiKey: "maxim-api-key", promptManagement: true });
const prompt = await maxim.getPrompt(
"prompt-id",
new QueryBuilder()
.promptVersionNumber(1) // fetches version 1
.build(),
);
```
```python Python theme={null}
from maxim import Maxim, Config
from maxim.models import QueryBuilder
maxim = Maxim(Config(api_key="", prompt_management=True))
prompt = maxim.get_prompt("prompt-id",
QueryBuilder()
.prompt_version_number(1) # fetches version 1
.build())
```